Showing posts with label Reproduction Props. Show all posts

07 April, 2015

M1911A1 Real Wood Grips Part 1

Over the Easter Holiday I decided to make a set of real wood grips for my M1911A1 to replace the nasty dark brown plastic grips which were on the pistol.

The M1911A1 is part of my Namsofting Loadout. Brown plastic grips are actually historically accurate on 1911s from WW2 onwards, but I like to imagine my 1911 was in fact an upgraded personal item rather than standard issue.

I could have bought some mass produced wooden grips cheaper, but the wood on those things is usually some nasty crap which was never on a real piece. I selected American Black Walnut, which is authentic for the M1911 and a premium quality woodworking timber.

This post is part one of a two part post. In this post I will cover how I made the grips and in the next post I will cover checkering. Checkering is the gunsmithing term for the diamond grip pattern. I think the smooth grips are very nice as they show the wood grain pattern to full effect due to their smoothness and uniformity. Much of the grain effect will be lost with the checkering.

As usual for my posts, here is a picture of the finished grips fitted to the M1911A1...

The CO2 mag is not exactly authentic! :-/
I started by finding somebody elses DXF files from a forum. I imported them into Solid Edge ST7, but ended up doing so much revision to them that I might as well have just drafted my own from scratch.

Revised DXF in Solid Edge ST7
I imported the revised DXF into CamBam and generated the toolpaths...

The most awesome CamBam
From there I generated G code which I fed into my CNC Router to cut the grips.,.

A clean workshop is a safe workshop! *cough*
This is how the grips come off the CNC Router...


As you can see there is still a lot of work to do on these grips to get them to a finished state. I finished cutting the grips out with a fret-saw and made this little jig to enable me to sand them on my belt sander without sanding my fingertips off (again!!!).


This little jig was made with 2 dowels and a board with similarly spaced holes. It enabled me to sand the grips while only sanding one knuckle bloody. Progress!!!


The sanding with a 400 grit belt really brings out the woodgrain.

I repeated the sanding on the other grip and test fit the grips to the pistol. They needed quite a bit of hand carving on the back face to make them fit the pistol correctly.


Two coats of Danish Oil really makes the wood-grain pop...

Before and After Danish Oil
The lustre turns much more matt and natural as the Danish Oil soaks into the wood.

Here are the wood grips side by side with the old plastic ones...


You can see that the lustre has gone.

Finally, here is another picture with the grips fitted to the pistol..


I am very happy with the finished result, so much that I am really reluctant to checker them now. I think I will make a second set and keep whichever ones I like best.

Thanks for reading and lookout for part two, coming as soon as my checkering tools arrive. :)
  

Update: The checkering tools have still not arrived so I made these grips from a very nice piece of Burr Elm.
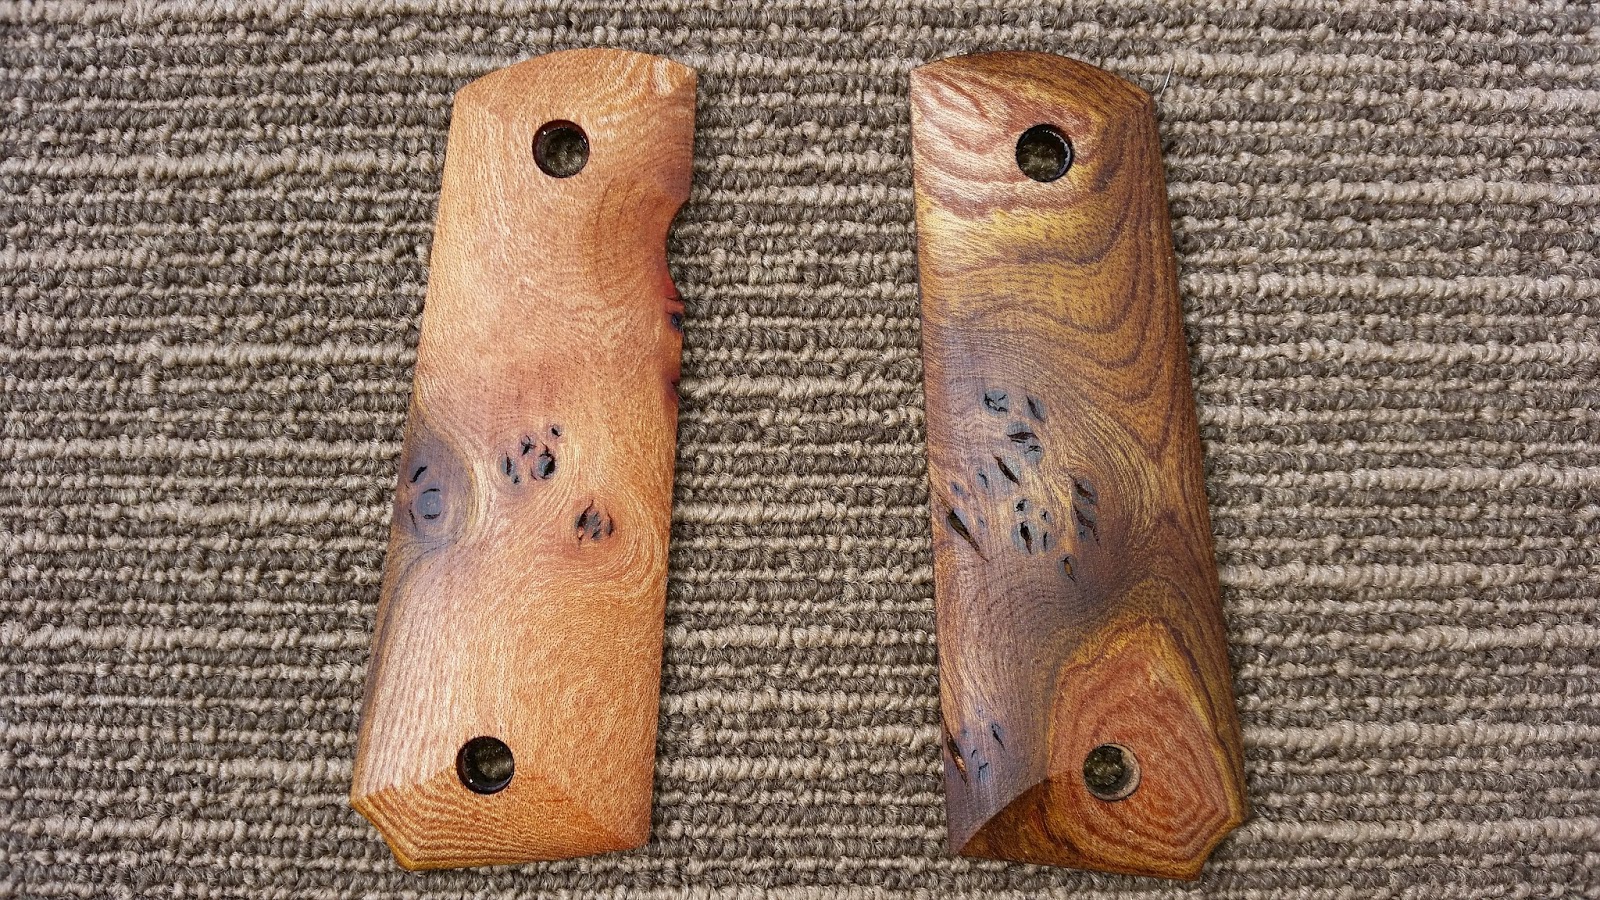
Scottish Burr Elm Grips


The figuring on this wood is very nice


These were also popular.


19 February, 2015

Vietnam Bug Juice

I recently found a single empty bottle in my camping gear and thought "That looks familiar", but I couldn't place where I had seen the bottle until I came across this image of proportedly real Vietnam issue bug juice from 1966.

image copyright sofmilitary.co.uk

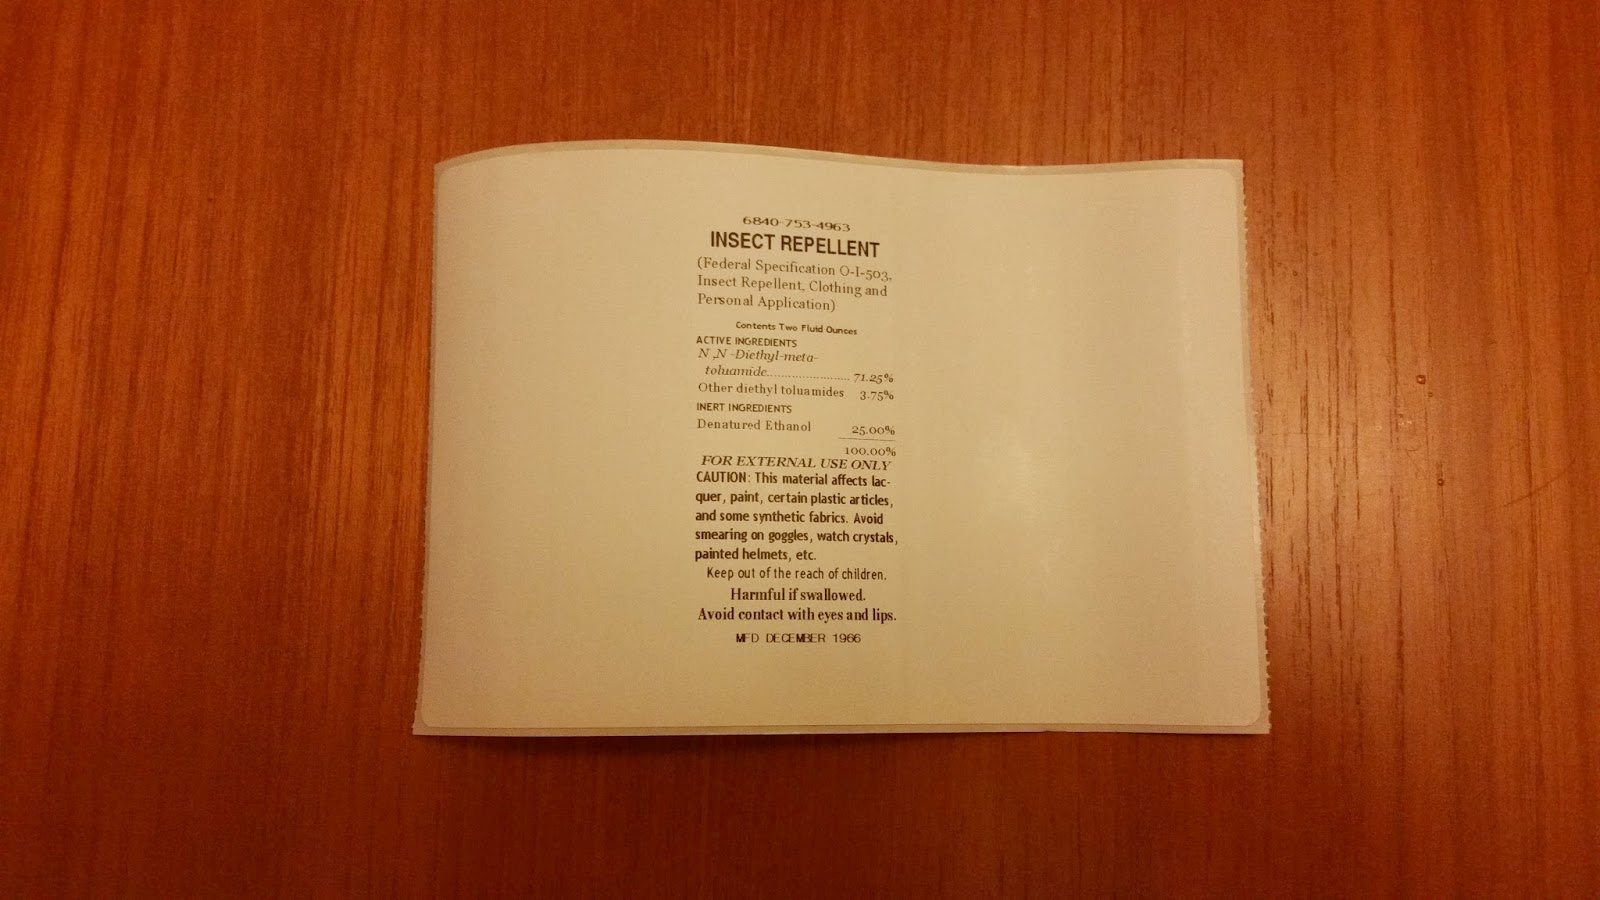
So I decided to turn my almost identical bottle into a prop. This is my finished reproduction...

my reproduction prop
Which I think is close enough to pass the stand off scale test.

I used Inkscape to layout the text and printed on my thermal label printer onto white adhesive labels which I then cut down.

 
before I trimmed the label

This is how the bottle looks under my helmet band...


Thanks for reading this mini-post. :)

08 May, 2014

Stand-off scale Light Mortar Theatrical Prop


I was asked to make a 60mm Light Mortar non-firing theatrical prop as a commission. The brief was that it had to;

  1. be cost efficient.
  2. accept some inert 60mm training rounds that the client already has.
  3. be stand-off scale. i.e. Give the impression of the item without being an exact replica.
  4. be robust.
  5. be incapable of ever firing a projectile should it be stolen and modified.

As usual this is not a build tutorial and do not try this at home.

This is what I was aiming to replicate as a 1:1 stand-off scale model...
image copyright ZM Tarnow.
This is what I came up with...


It was made out of some scrap scaffolding tube, a scaffolding foot, an old car jack and an old spacesaver wheel that were donated by various people. To this donated pile of bits, I had to buy two small pieces of steel plate, 68mm plastic pipe, some plastic brackets, a delrin (engineering plastic) plate, various M10 and M6 bolts, welding rods and two tins of spray paint.

That is a lot of steel to cut. Luckily I have two of these Evolution saws, a circular saw and a small mitre saw which can cut through steel like butter...

With all the parts cut, I set about welding with my little stick welder. Hands up I am not a good welder. I weld once or twice a year, and I do it so infrequently that its always a learning experience for me. Because the donated steel was galvanised (with zinc), I had to sand off the zinc layer where I was going to weld. Welding with zinc can cause troubling health problems.


This is the first fit. Note the mole grip holding it together...

I found cans of this this nice 'Soviet Green' colour in Lidl. Here you can see the prop in it's three parts. In use it slots together and stands solid...


The prop cannot be aimed, as it has no aiming device. It cannot be adjusted as it is welded solid, and the plastic pipe and fittings are incapable of containing energy. Therefore it is truly non functional.


Thanks for reading. :)


04 March, 2014

Riot Shield Prop

Recently I had to make a riot shield for a MilSim event based in an Eastern Country. It's a fairly simple project so I won't go into it blow by blow, but it's basically a sheet of polycarbonate, a block of painted MDF and some arm braces made from 3mm thick sheet rubber, bolted and screwed together.


The white vinyl lettering had to be Cyrillic to fit with the Eastern Europe theme. Ten bonus points to you if you know what it says!
(scroll to the bottom of this page for the answer)


Hopefully the rubber braces will stretch to accommodate all the people who will use the prop.


It fits me fine, although I don't have weightlifter type forearms.


The Cyrillic letters say "Pu$$y Riot". This is not a political statement and I'm not trying to offend anybody, it's just the first search result I got from Google when searching for Cyrillic "Riot" text, and I thought it would be a bit of fun to have a Pu$$y Riot Shield. :)

Sometimes, I feel people take airsoft way too seriously!

13 December, 2013

Adding radio comms to a German Army field telephone

I was asked a while ago if I could make an old bakelite German Army field telephone work as a walkie-talkie.

Bundeswehr field telephone, circa 1970.

It would be used by a WW2 airsoft re-enactor to communicate with the rest of his team in a more authentic manner. Even though it is no where near as old as a WW2 original it certainly is a very close relative, as can be seen from this photograph.

Wehrmacht field telephone, 1941.
Image copyright: The Museum of Technology 

It's a close enough match that you would need to be close up and knowledgeable of German Army field telephones to know that it is not WW2 era. This is fine for an airsoft prop for a casual re-enactor.

Both of us would have reservations on 'hacking up' an original WW2 object simply for the purposes of an airsoft prop. The 1970's field telephone comes from less important period in history and there are many more of them around, so we felt that it was much less of a travesty.

The approach I took was to externalise the mike, speaker and push to talk switch via the headset socket, which can be seen in this next photograph. The grey circular thing is the mike from the field telephone and the little black speaker is from the radio.

Prototyping the electronics

I later successfully also used the speaker from the field telephone but it was quite large, and I thought the current from the radio would not be sufficient to drive it at acceptable volumes, and this is why I initially used the radio speaker. In the end, it worked perfectly. I also initially used the mike from the radio, but I cooked it during the de-solder process and it was absolutely ruined. With a lack of spare mikes to hand I was (luckily) forced to use the grey one. Note also that in the photo above the black vinyl cable is not very WW2 looking. I stripped out the wire cores from the braided black nylon cable and re-cored it by hand with modern cable, so its olde-worlde on the outside but modern on the inside. ;) I also buggered up my hands with friction burns in the process. It looks like I have been abseiling without gloves :(

The field telephone headset integrated with the radio

In the above photo you will notice a grey bar on the headset. I wired this into the system and it now functions as a push to talk button. The system can be fully used, as pictured in the photo above. The base of the field telephone actually has no function in the rewired system other than looking authentic.

The complete system
With all the components of the system together it is ready for use. Hopefully I can get a pic of it in use to post.

As always, thanks for reading! :D

19 November, 2013

Vinyl spray painting templates, two colour and four colour camo patterns

I've been working on spray painting templates, mainly for spraying airsoft rifles. There are techniques which I have posted on previously which allow anybody to create a simple and effective generic camo pattern, but what if you want something specific?

What if you want a G36 in the desert variant of Flecktarn? That's not easy to achieve on the kitchen table. Cutting out all those little blobs and dots. I could have sourced somebody who can dip the gun, but I have previously attempted this and found the service to be very expensive and you have to send the items away to their workshop. Add to that, the chance of finding your desired specific camo pattern as a dip is low.

German Issue Desert Flecktarn Camo
I thought there has to be an easier, less expensive way where I could do this at home. So, I CNC cut some flecktarn spray painting stencils in specialist spray paint stencil sheet and sprayed up my G36C. This was the result, although the colour balance in this photo is a bit blue due to the lighting in my messy studio.


I also developed a two colour desert, British Army CS95 DPM stencil, which I will cover in this post. Unfortunately I was all out of desert spray colours, so I have used Black and Olive Drab in this example. The colours in this demonstration are irrelevant, the principal is the same. However for finished pieces, correct colour matching is critical to success.

For those of you not in the know, two colour desert DPM looks like this...


You will notice that it is a brown colour on top of a sand coloured background. As I said previously I will use different colours black on top of an olive background.

In all things preparation is key. Spray-paint will be prone to wear off items which receive a lot of rough treatment. If you don't prepare the surface before painting this will happen that much quicker. The key to maintaining the new finish for as long as possible is to prepare the item by cleaning it thoroughly and giving it a wipe down with a degreasing agent such as isopropanol. Then the item must be completely dry before painting.

I'm not going over how to spray paint here. I will say for the moment, don't spray outdoors, and more light coats are better than one thick coat. You need to be patient and build up a good finish.

So the first step is to spray the top colour over 100% of the item. I sprayed a magazine with my top colour (black) but of course a desert DPM's top colour would be brown, please bear in mind this is simply a demonstration of the masking technique. I first masked the feed areas with masking tape to prevent feed issues.

Protecting the moving bits with masking tape

The top colour sprayed
I then left the first coat to be touch dry, then waited another 30 minutes and sprayed a second coat.

After waiting for the second coat to be touch dry plus 30 minutes I was ready to apply the stencil decals.

The stencil vinyl has a very low tack glue, similar to the glue on a Post-It note. It will not pull off spray paint from a correctly prepared surface where that spray paint that has been allowed to dry properly.

It lifts very easily from the backing sheet with a craft knife or other thin blade, or even a needle.


I then applied the mask to the magazine that I wanted to paint, taking care to work the thin and flexible mask into all the nooks and crannies. Until the mask is worked in, it can be repositioned. It is very important to visualise the effect you are trying to emulate while placing the stencils. If I just placed the stencil masks at random, the quality of the effect would not be as good.

First positioning

Worked in to the shape of the magazine.

It is a simple case of repeating this process until the piece was fully masked. Carefully working each piece in with nothing more than very light finger pressure.

The fully masked magazine.
As you can see, one sheet would mask several magazines. Every part of the stencil can be used.

Then I sprayed two coats of the next colour, waiting until the first coat was touch dry plus 30 minutes, before applying the second.

The olive drab coat
It is imperative to be patient and wait for the paint to dry at each stage. Then comes the fun bit, carefully picking off the stencil from the completely dry magazine to reveal the actual finish.


In theory I could emulate most traditional camo patterns. Thanks for reading.

If you have any questions, please feel free to contact me via this link.